
I could never fit all that I want to include on my Gilmore Girls graphgan without it fitting a California King sized bed. I want my blanket to be a large throw size for curling up with on the couch. Because of that, tough decisions were made and some squares had to be cut. Meaning, I didn’t make all the squares that I released (20 small squares + Luke’s + banners), but stuck to the original layout–Luke’s center square + 12 smaller squares surrounding + the Gilmore Girls banner (+ the Chilton mini-banner along the bottom that I’m currently working on).
The solution to my dilemma? Appliques. I love making appliques. They can be simple or complex and quite easy to attach to almost anything. Here are the appliques I decided on:
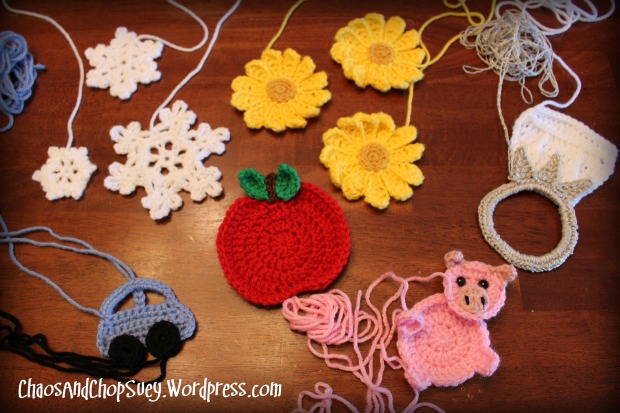
SNOWFLAKES
I wanted snowflakes because of my Lorelai’s obsession with snow. From snow being magical to having an uncanny ability to smell snow before it comes (without snow being in the forecast), snow always has a big part in the winter episodes. And because no snowflakes are the same, I had to include several different kinds. Here all the snowflakes I used on my blanket (I used Hobby Lobby’s I Love This Yarn in #10 White for all my snowflakes and kinda just winged it with the hook sizes):
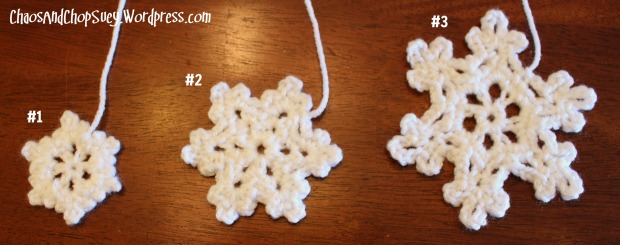
Snowflake #1: Flower Girl Cottage
Snowflake #2: Attic24
Snowflake #3: The Hobbee Hive
APPLE
I needed to include an apple to symbolize Rory’s revelation at the very end of the revival, and what better way to do this than to include an apple? You may have noticed that during Week #7, I released an apple square to symbolize the same exact thing, but like I mentioned earlier, I had to make cuts and the apple square didn’t make it because I could easily make a little applique. The designer even has a video for this if you need it (it’s linked on her website I posted below).
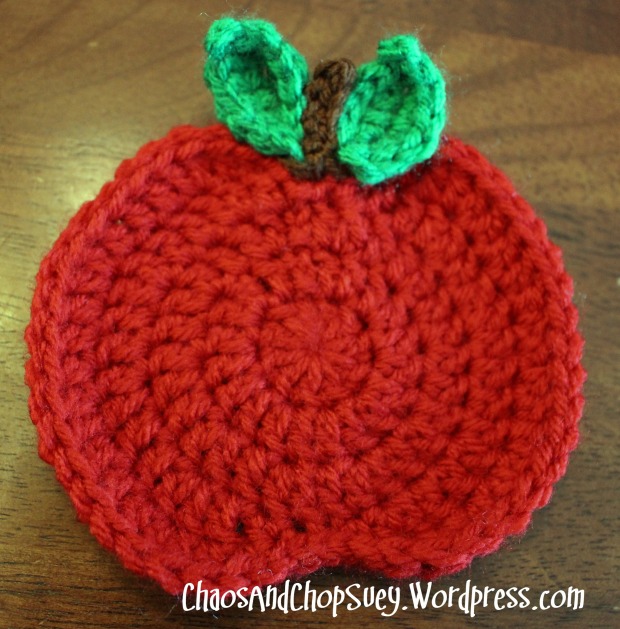
Apple: Happy Berry
DAISIES
Who can forget the episode where Max Medina proposes (a second time) to Lorelai by sending 1,000 yellow daisies to her at the Independence Inn? Of all her suitors, I liked Max the best. So, using my trusty I Love This Yarn #330 Yellow and #356 Sungold for the centers, I made a trio of yellow daisies to scatter around the blanket as a tribute this:
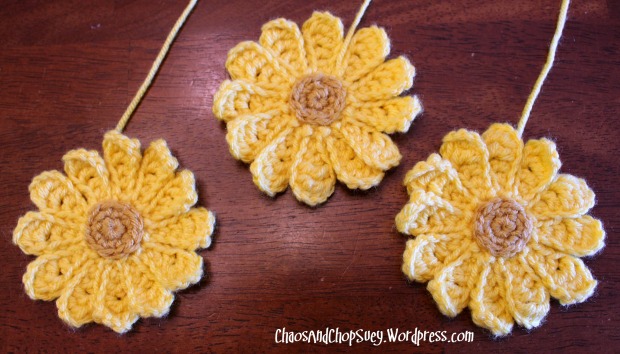
Yellow Daisies: Repeat Crafter Me
RORY’S FIRST CAR (DEAN)
I opted to skip the original Rory’s First Car (Dean) square with the same inspiration so I could make Sookie’s square. But, I wanted to put that car on my blanket somewhere because it’s a big part of Rory and Dean’s (first car, first “I love you”), and Rory and Jess’ relationship (when Jess crashes the car with Rory in it). So, I set out to find an applique that looked like her car. And I found one. I followed the directions except I used I Love This Yarn (WW) in Medium Blue and Black, and a 4.5mm hook. I also used hdc for the wheels rather than the dc in the pattern.
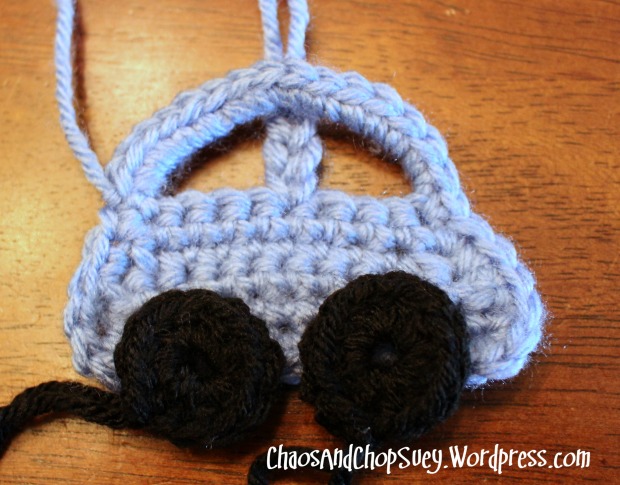
Rory’s First Car: Mammy Made
PETAL THE PIG (KIRK)
I skipped Petal the Pig’s square as well. I loved that little pig in the revival and I love Kirk’s character in the series, so I knew I had to include them in the blanket as well. I made my own pig pattern up:
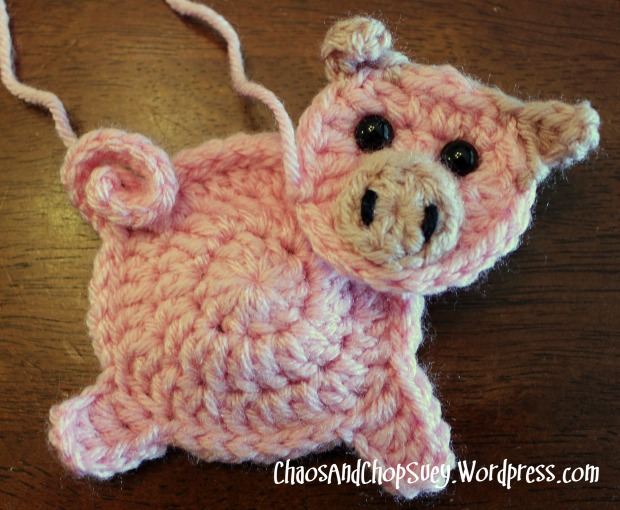
Here’s what I used:
Hobby Lobby’s I Love This Yarn in Rosy Cheeks (#101), Pink (#100), Black (#30)
8mm safety eyes (I buy mine from 6060 on Etsy)
Clover 4.5mm hook
**NOTE** Chain 2 at the beginning of rounds are NOT counted as a dc.
BODY, TAIL, & LEGS:
Round 1: With Pink, make a Magic Ring. Chain 2 and make 10 dc in Magic Ring. Sl st first dc at the beginning of the round. Pull Magic Ring tight. [10 dc]
Round 2: Chain 2. 2 dc in same stitch as chain 2. 2 dc in every stitch around. Sl st to first dc of the round. [20 dc]
Round 3: Chain 2. 1 dc in same stitch as chain 2. 2 dc in next stitch. *1 dc in next stitch. 2 dc in next stitch.* Repeat from *to* all the way around. Sl st to first dc of the round. [30 dc]
Round 4: TAIL Chain 15. Sl st in second chain from hook, and every chain. Sl st to body in same dc as the base of the chain. [15 sl st]
Round 5: LEGS (This is a continuation of round 4, but will be making the legs for the pig). Sl st 5 times. *Chain 6. dc in 4th chain from your hook. dc in next 2 chains. Skip 1 dc on body.* Sl st in next 7 dc. Repeat from *to* to make front leg. Sl st in next dc, and every dc around to tail. Sl st and fasten off, leaving a long tail to attach applique to blanket.
HEAD:
Round 1: With Pink, make a Magic Ring. Chain 2 and make 10 dc in Magic Ring. Sl st first dc at the beginning of the round. Pull Magic Ring tight. [10 dc]
Round 2: Chain 2. 2 dc in same stitch as chain 2. 2 dc in every stitch around. Sl st to first dc of the round. Fasten off leaving a long tail to attach applique to blanket. [20 dc]
EARS:
With Rosy Cheeks, attach to any dc with a Sl st.*Chain 5. sc in 3rd chain from your hook. hdc in next 2 chains. Skip 1 dc on head. Sl st in next dc.*
Fold top of head down towards you. Sl st in the 3rd loop behind the next 3 dc (not the back loop, but the 3rd loop below that back look so it’s hidden from the front of head). Chain 1, Sl st in next dc. Repeat *to* to make second ear. Fasten off. Weave in tails.
NOSE:
With Rosy Cheeks, make a Magic Ring. Chain 2 and make 10 hdc in Magic Ring. Sl st first hdc at the beginning of the round. Pull Magic Ring tight. Fasten off. Sew to HEAD so bottom edges are touching. You may choose to add black nostrils with pieces of black scrap yarn.[10 hdc]
EYES:
Attach 8mm safety eyes to HEAD above nose.
**NOTE** It’s okay if your applique curls. It will lay flat once you attach it to your blanket.
DIAMOND RING
I needed to do something for Luke and Lorelai’s wedding in the revival because IT FINALLY HAPPENED, but didn’t want to go with the stereotypical wedding rings or wedding bells on a square because I felt like the squares were all a little more in depth than stereotypical stuff. I searched and searched for a crocheted wedding ring applique, and found nothing. So, I made my own:
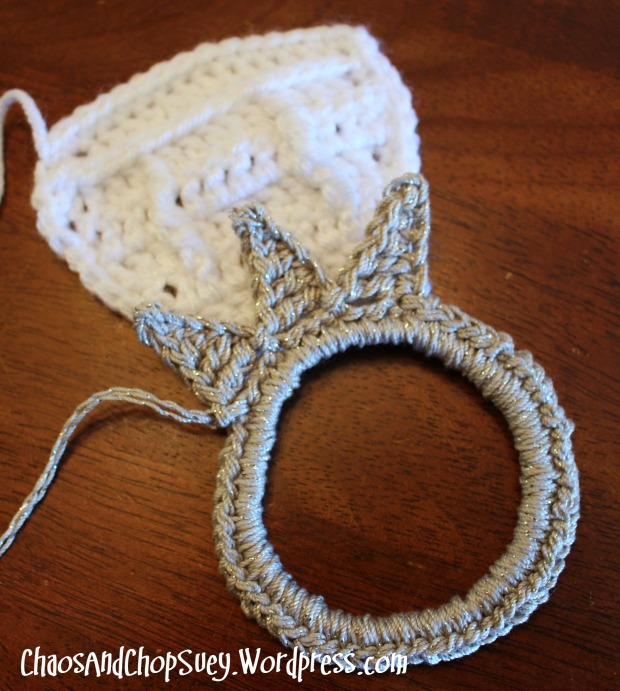
Here’s what I used:
Red Heart’s Fashion Crochet Thread in Silver (leftover from another project)
Hobby Lobby’s I Love This Yarn in #10 White
Clover 4.5mm hook
RING:
I tripled my thin shiny silver thread using Briana K’s awesome video on making a triple thick strand using just one skein. Seriously. Good stuff to know.
Using the triple thick thread, I made about 30 chains and joined together with a slip stitch to make a circle about 3′ across.
Chain 1. sc into the circle (not into the chains) all the way around your circle. Every once in a while I stopped to push my all my stitches together so it was a nice solid ring of sc’s. Join with a slip stitch to the first sc.
*Chain 6. In the second chain from your hook, Sl st. sc in next chain, hdc in next chain, dc in next chain, tr in last chain. Skip 2 sc (depending on your tension, you may have to adjust how many sc to skip–skip as many as you need to equal the height of your tr. In my case, my tr is the same height as the width of 2 sc), Sl st in the 3rd sc.* Repeat *to* 2 more times. Fasten off, leaving a long tail for attaching your applique! You will have a total of 3 “spikes” to anchor your diamond to the ring.
DIAMOND:
**NOTE** Chain 2 at the beginning of the row is considered 1 dc.
Here’s a great video in case you don’t know how to use FPdc and BPdc to create the ribbing on the diamond:
Row 1: Using white yarn and same hook, chain 11. dc in the fourth chain from your hook. dc in every chain. [9 dc]
Row 2: (WS) Chain 3, turn. dc in first dc. dc in next 6 stitches. 2 dc in turning chain. [11 dc]
Row 3: (RS) Chain 3, turn. dc in first dc. FPdc in next stitch. dc in next 5 stitches. FPdc in next stitch. dc in next stitch. 2 dc in turning chain. [11 dc+2 FPdc]
Row 4: (WS) Chain 3, turn. dc in first dc. dc in next 2 stitches. BPdc around FPdc from previous row. dc in next 5 stitches. BPdc around FPdc from previous row. dc in next 2 stitches. 2 dc in turning chain. [13 dc+2 BPdc]
Row 5: (RS) Chain 3, turn. dc in second stitch (no increase this row!!!). dc in next 2 stitches. FPdc around BPdc from previous row. dc in next 5 stitches. FPdc around BPdc from previous row. dc in next 3 stitches. dc in turning chain. [13 dc+2 BPdc]
Row 6: (WS) Chain 1, turn. Sl st in every stitch. [15 Sl st]
Row 7: (RS) Chain 1. Working into the back loop from ROW 5 (not the slip stitch row), sc2tog over first 2 stitches, hdc in next stitch, dc in next 3 stitches, tr in next 3 stitches, dc in next 3 stitches, hdc in next stitch, sc2tog over last 2 stitches.
Final round: Chain 1, turn piece so it is sideways and sc around the entire piece. Sl st to first sc and fasten off, leaving a long tail to sew applique to blanket.
PAW PRINT
In an effort to pay tribute to the Gilmore females’ dog–Paul Anka, named after the singer Paul Anka, I added a paw print applique to my blanket. The idea came from someone in our CAL Facebook group, and I loved it, so I went with it.
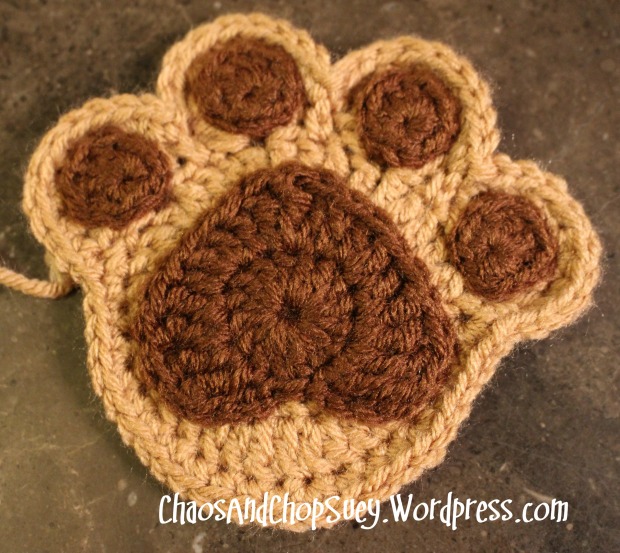
Here’s what I used:
3.75mm Clover crochet hook
Hobby Lobby’s I Love This Yarn in Toasted Almond (#150) & Brown (#160)
This video is for making the background of the pawprint is below.
The tutorial for the pads on the paw print are located here: Mary J Handmade
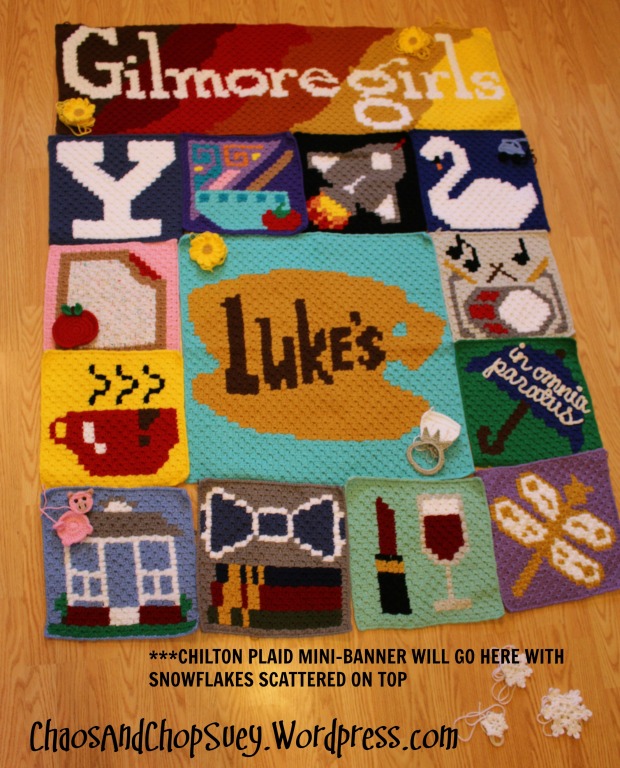
LAYOUT
Here is my current layout before the squares are all sewn together and before all the appliques are attached. It probably won’t change since I have them all stacked in the right order for me to attach them all together. The only thing missing is the Chilton Plaid Mini-Banner I just released yesterday–I still have to finish making that one.
For more information on the this CAL, check out this IMPORTANT DOCUMENT.
While my Gilmore Girls CAL posts will stay up and remain free, for convenience, I have also combined all of these graphs into one giant PDF file for those that would like to purchase a copy of it condensed, rather than having to hunt thru my posts. You can purchase this pattern for a small fee here on Ravelry.
Feel free to make and sell products using this, but because I put a lot of time and love into this big CAL project, I ask that you give me credit or if it’s online somewhere, you link back to me. If you’re not a part of our CAL FB group, come and join us here.
I can’t wait to see what you do with this! The official hastag for this CAL is:
#CHAOSANDCHOPSUEYGGCAL
Copper Boom!
<3, Angela

Where can I find the patterns for the squares other than the ones in the links? I loooovvveee this btw! Thank you for sharing it :)
LikeLike
They’re all on my blog scattered over 9 weeks. If you don’t want to search, you can purchase a PDF of everything in one place for $2 in my Ravelry store. Here’s the link for that if you’d rather not hunt: http://www.ravelry.com/patterns/library/gilmore-girls-blanket
LikeLike