Stars, Stripes, and Rings

Figure skating is my first love. It’s the thing I first remember falling in love with. I started figure skating when I was 6 years old. I skated all the way thru college (and beyond), and started coaching as a college student. In fact, I coached on my skates while pregnant with my twins up until the point where I could no longer bend over enough to tie my own skates (at about 7 months).

skates

In case you didn’t know, the 2018 Winter Olympics are about to start (opening ceremonies air February 9 on NBC here in the United States), and I couldn’t be more excited. I’m one of those Winter Olympics fans that annoy the non-Winter Olympics fans in my house. When you grew up figure skating, the way you watch the figure skating events is like none-other. For some reason, figure skaters clench and feel the moves happening on the ice. Even if we could never pull those moves off. I want to say it’s muscle memory since that’s what was ingrained in my head during every practice. Perhaps it’s the excitement of the event. Or a combination. Whatever it is, it happens. And I’m looking forward to going thru this again starting next week :)

You can find all the information on when each event is happening here on this awesome schedule: Time’s Winter Olympic Schedule PyeongChang2018

Or on the official PyeongChang 2018 Winter Olympics website.

27503457_1574196315949067_3345421049594472109_o

It’s been cold here lately and I’ve been cuddling up in my house with scarves and sweaters and blankets galore. I knew I’d want to watch the Pyeongchang Olympics with something…festive. So, I whipped up a little something to wear–a Team USA scarf. Now I’m ready to cheer on all of the amazing athletes as they represent their own countries (of course I’ll cheer a little louder for our own athletes).

down the ice1

I worked up this super scarf using a size H (5.0mm) hook, worsted weight (on the lighter side) yarn from Hobby Lobby’s line I Love This Yarn, and a traditional corner-to-corner (c2c) stitch. The entire scarf is worked up in one piece, with the stars added on afterwards as appliques. I finished the piece off with a simple single crochet border around the edge, taking care to do sc+chain 2+sc in each corner.

with skates

You can grab the file for this graph right here:

ChaosAndChopSuey-Team USA Olympic Scarf-Graph pattern

You can grab the file for the written instructions (for the graph) right here:

ChaosAndChopSuey-Team USA Olympic Scarf-Written Instructions

Here are the colors that I used for this scarf:

scarf colors

And those awesome star appliques? Well, I found them in two different places. The large stars are from One Dog Woof. I followed her directions as written for my 3 largest stars, making the stars one layer thick, then attaching them to my scarf with a needle and the long remaining tail from each star. And the 2 smallest stars are from Repeat Crafter Me, again, as written.

27164054_1570379849664047_2027663545068127190_o

scarf

As always, feel free to use my patterns to make gifts or items to sell, but do not copy my images or patterns in any shape. It’s awesome when you link back to my page on social media. To check out more of my patterns, head on over to my Ravelry store!

Don’t forget to tag me or use my #ChaosAndChopSuey hashtag when posting on social media–I love seeing what you all are doing!!

#CHAOSANDCHOPSUEY

<3, Angela

Snowflakes, Unicorns, and Cakes

Whew! It has been a long time since I’ve written a blog post in here! The holidays and end of the semester kept me so busy. I haven’t had too much time to be creative with my crocheting lately, but that doesn’t mean I haven’t made plans for the new year! I’ve got lots in store for you this year (well, what I have planned anyway).

During the break, my kids and I had the chance to play in snow in our own yard for a few days. It doesn’t snow often (this is the first time my kids have had a ‘real’ snow instead of just some frozen slushy icy rain) so we made the best of it!

26168324_10156152893554916_2913030992225986775_n

Last week was my birthday and I decided to make my own cake this year. Now, I love to cook and I enjoy baking, but I don’t usually make decorated or fancy looking things. Think function over fashion. But this year, I decided to try my hand at decorating a cake. Now, I’ll totally fess up to scouring Pinterest for inspiration after watching one-too-many videos from Yolanda Gamp over at How To Cake It.

But I did it. I was directed to a yummy vanilla cake recipe from Rock Recipes. And a simple homemade vanilla buttercream frosting recipe. I used fondant for the first time as well. Anyway, here’s my first attempt at making a decorated cake. I present my Unicorn Pinata cake:

26907235_10156197443929916_9029976390824753646_n

26814603_10156197444584916_4719673658681741150_n

Not too bad for my first attempt. It’s not perfect, but I was pretty happy with the outcome. And, I’m not much for cake (though, I do love a good buttercream frosting), but this cake recipe was really good and I actually ate some of it! My kids loved seeing the sprinkles spill out when we cut into the cake. As for the rest of the cake, I sliced it up, wrapped up each piece in some saran wrap, and stuck them in the freezer for an attack of the sweet tooth. Makes it so we won’t eat the entire cake at once and saves some for later!

I’m now on ETSY!!!

Guess what everyone? I’M ON ETSY!! That’s right, you can now purchase my patterns in both my Ravelry shop AND my Etsy store!

Etsy shop

My IN-PROGRESS crochet-a-longs are ONLY available on Ravelry, NOT in my Etsy shop. That’s because Ravelry makes it soooo easy for us designers to update our patterns–they even send out automated messages and emails anytime there is an update. Have no fear, my crochet-a-longs will be added to my Etsy shop as they conclude and the pattern is in it’s entirety.

Custom Listing picture

I am now open for CUSTOM GRAPH orders as well. The current turnaround time starts at one week depending on the level of detail required. Prices start at $8 for a custom graph that includes several sizes (for printing purposes) of colored graphs. I can also include yarn color suggestions if that is desired.

While you’re here, check out my most recent custom graph. This ‘Hocus Pocus’ inspired graph will be available for purchase in my Etsy store on Friday, September 15, 2017.

ChaosAndChopSuey - Halloween 3 Witches Graph - Watermark.jpg

FRIENDS CAL Week #1: The One with the Couch

The time has finally come for our FRIENDS themed graphgan crochet-a-long (CAL) to begin! It seemed only fitting that our first week’s inspiration comes from the opening credits-the couch in Central Perk.

which-friends-sofa-are-you-2-12866-1425345502-19_dblbig

That orangey couch is not only in the opening credits, but it’s seen in every episode that has a scene in Central Perk, which is practically every episode. That couch has seen a lot-from runaway brides (Rachel fleeing her wedding to Barry in the very first episode) to Phoebe’s boyfriend that didn’t wear enough clothing to some fabulous guest stars (Robin Williams and Billy Crystal).

1411036126592_wps_23_dmxyht_friends_nbc_univer

In homage to this piece of furniture that was an anchor for so many, I give you ‘The One with the Couch’:

couch-50x25-closeup

couch-50x25-full

The One With the Couch (and hook).jpg

Love my hook and want one of your own? Head on over to Angie at Harper Baby Shop.

For more information on the this CAL or to purchase your copy of this crochet-a-long, head on over to my Ravelry store.

Feel free to make and sell products using this, but because I put a lot of time and love into this big CAL project, I ask that you give me credit or if it’s online somewhere, you link back to me. If you’re not a part of our CAL Facebook group, come and join us. We have a special Facebook group reserved only for those that are doing the FRIENDS CAL with us (you can find information on how to join that particular group in your purchased pattern).

I can’t wait to see what you do with this! The official hastag for this CAL is:

#CHAOSANDCHOPSUEYFRIENDSCAL

“Welcome to the real world. It sucks. You’re gonna love it!” –Monica

<3, Angela

A Twin Birth Story

A fellow twin momma friend of mine, who among many things, happens to be a doula. April is Cesarean Awareness month and in honor of that, she asked for my birth story knowing that I gave birth to my twins via cesarean section almost four years ago.

I’ve never told my story in a public way, nor did I ever think it was of any importance to anyone. That was until I realized how empowering it is to read and hear about others’ experience with their own births. Not one is ever the same. Even with striking similarities, there will never be anyone that will understand it from your point of view.

My friend Jenn over at Asana Doula Services has been running a series on her Facebook page to celebrate Cesarean Awareness month with cesarean birth stories of all sorts, including her own. The purpose of this month is to raise awareness to help prevent unnecessary cesarean births and to advocate for VBACs (Vaginal Birth After Cesarean).

Here is my story:


pregnancy photo

My favorite pregnancy photo, taken by a friend’s mother.

My husband and I had been trying for just over five years to get pregnant. We knew right off the back we’d need help. So five years of off and on fertility treatments went by with one pregnancy that I miscarried just days after positive bloodwork.


The day of our last shot at getting pregnant was like any other time we tried. My husband and I would drive to the reproductive laboratory located away from the hospital, where he would leave me alone in a waiting room with a television and some hot apple cider to go and “do his thing.” I never saw another person in that waiting room the entire time we were there. We had to wait about an hour for the lab to do what they needed to do, after which, I would leave the lab with a tiny vial tucked between my boobs to transport it to the hospital where the fertility clinic was located. On this particular morning, my husband and I drove to the laboratory separately because he was not following me to the hospital. It was not a big deal to me at this point since we were already in the state of mind where we thought that this was never going to work. All I was doing at the hospital was laying on my back for 30 minutes after they turkey basted me with that vial I was holding between my boobs. We like to joke that my doctor got me pregnant while my husband was at work. This being our last shot at getting pregnant (hubby had already started the adoption research), we went all ‘balls to the wall’ in.

Raccoon Eyes

The ultrasound that confirmed that we were having twins. We nicknamed this ultrasound “Racoon Eyes.”

You have to wait an incredibly long time between the procedure and getting confirmation whether you were pregnant or not. At least it felt like an incredibly long time. Two weeks. Two weeks is a long time when you’re in this sort of situation. I wasn’t careful for those two weeks between treatment and bloodwork this last time–I did everything they tell you not to do when you’re pregnant or hope to be pregnant like I had listened to for the last five years. Low and behold, I received a call the same day as my bloodwork and I was pregnant! Yay! 24 hours later I had to go in and have my hormone levels checked again to make sure they were multiplying the way they should. I got a phone call before I even got home from the fertility clinic saying that my levels were terrific and a bit…er…high. I needed to schedule an ultrasound in two weeks so we could “figure out who all was in there and how many of them there were” (famous words from my fertility specialist). Levels are supposed to double every 72 hours, and mine had more than tripled, which is usually an indicator of more than one baby. For two weeks, my husband and I were shitting bricks and trying to figure out what we would do if we had quadruplets (it was a possibility). Anyway, we found out we were having twins.

12980710_10154208856999916_1365584111_o

This was how we announced my pregnancy.

Even though I had an uncomplicated pregnancy, I still had OB visits every week until the end, when I was there at least twice a week. This was because of my past history and difficulties with getting pregnant. My husband left for a deployment when I was 17 weeks pregnant, just days before my anatomy (and gender) scan with a perinatologist. At 26 weeks, I was ordered to cut down my work days to half days (I was a preschool teacher and play therapist). twinsSomewhere around 30 weeks, my doctors and I started talking about labor and delivery. I don’t really recall receiving any clear options or information about birthing plans (which is something I didn’t really know about until it was too late). By now both of my babies were breech where they proceeded to sit for the remainder of my pregnancy. My doctors planned a Cesarean section for me at 38 weeks because they said they wouldn’t let me go beyond that for the health of myself and my babies, though my doctor said he doubted I’d ever make it that far along because of my height and how far out I was already carrying my babies. I can’t say my uneducated-self disagreed with him there.

33 Weeks

Me @ 33 weeks. This is my last photo of my pregnant belly.

At 31 (and again at 33) weeks, I was admitted to Labor and Delivery (L&D) after a check-up because my contractions were too frequent for my doc’s liking. Thankfully they were able to slow them down without meds and sent me home both times. Lucky for me, my husband was sent home from his deployment mid-tour at 32 weeks to attend a school located near us because it coincided with the babies’ birth. I was lucky to have him home because I don’t know how I would have survived with him gone those last few weeks. I didn’t know how much help I really needed until he came home. Somewhere around my 32 or 33 week appointments, my doctor saw me standing up (he usually only saw me on the table, so this was a bit different) and he jokingly teased me in his thick Southern accent saying, “My, you’re just about round as you are tall.” Standing at only five feet tall, it was entirely possible. I later went home and measured myself, and sure enough, I was more around that I was tall at that point. My last day of work was Monday, April 30 (34 weeks) but I had been miserable for about a week before that.

On Wednesday, May 2, my husband came home from school that day and jokingly said he wanted to take me to the gym and walk a couple miles on the treadmill because he really didn’t want to go on a long run that was scheduled the next day. Well, at midnight that night I had to call my OB because my contractions were less than 15 minutes apart. I went into L&D at midnight (so now it’s May 3). By the time we got there, my contractions were closer to five minutes apart. After four hours of trying to get the contractions to slow down, they only sped up to three minutes apart. I wasn’t dilated but a smidge either. At about 4:30am my anesthesiologist came in and gave me the run down on what was going to happen just in case we went in to deliver that morning. He said it would all happen quickly with quite a few people around and he wanted me to be prepared and to be able to answer any questions I had then. He was a sweet man, but that’s all I remember about him.

When my doc finally made the call that we were going to go forward and have me some babies that day, it all went by in a blur. I was given some meds to relax me because I was starting to panic and freak out a little bit. Man, that was some good stuff…I was completely awake, just relaxed. I should say here that I wanted to have my babies vaginally, but both babies were breech. I would have been able to deliver them vaginally if baby A had been head down, but such was not the case. I remember being wheeled into the Operating Room (OR) without my husband who was in the waiting room waiting for the nurse to come and get him when they were ready for him to be in the OR. I moved myself onto the table and gave my nurse a big hug while the anesthesiologist gave me my spinal block. I squeezed the crap out of her and she was so nice about it. I recall apologizing profusely for squeezing so hard. While I was laying down waiting while they prepped, I remember the doctor yelling “Get the husband! Get the husband!” He almost missed it and had to run with the nurse through the hallway while putting on his gown and hat. Between getting my spinal and delivering the babies, it all happened so fast and with the meds they had given me, the actual delivery is a blur.

x354-q80

image via Wanelo

At 6:59am May 3, T and E were born at 34.5 weeks. T was 5 pounds 2 ounces, and E was 4 pounds 4.5 ounces. I couldn’t see what was going on because I had a screen blocking me from seeing my belly, but they brought T over to me and gave him to my husband. I got to smell his head and give him a nuzzle. E was whisked away to the neonatal intensive-care unit (NICU) after being shown to me briefly. My husband followed her down to make sure everything was okay. Other than being little, she was perfect. I remember not getting to touch either one of them because my hands were strapped down sticking out from my body like I was on a crucifix.

Once I was in the recovery room, my husband was able to come in with T. I was still shaky and numb from the anesthesia wearing off so I was afraid to hold him, so my husband held him for me so I could nuzzle him. Soon I was in my room with T bedside. As soon as I could feel my legs, I was able to shuffle myself into a wheelchair, and go down to the NICU to see E. She was the happiest little baby. She was tiny, but one of the bigger babies down there (she missed the regular nursery by just a few ounces). And she was so happy. She smiled as soon as I picked her up and spoke to her. The hardest part of the delivery was having my babies in two separate places. Neither could go see each other, and wouldn’t see each other until they were 10 days old when E was finally released from the NICU. On my very first Mother’s Day, E came home and I was able to hold both my babies together for the first time ever.

First Mothers Day

My first Mother’s Day: the day E came home and the first time the babies were together since their birth

My story is not very detailed and without feelings or emotions because that’s kinda how I see their birth. It was so sterile and without much emotion until it caught up with me a bit later. I kinda got swept away by the doctors and was lost. I didn’t know about doulas, and now that I do, I realize I really could have used one there with me. I didn’t know there were things I could do–to advocate for myself and my babies. I thought, ‘Well, the doctors know what’s best, so why would I question it?’ It’s a very naive way to think, but I had done so much research on how to get pregnant and stay pregnant, I thought I had 4 more weeks to prepare on how to approach the delivery. I feel robbed of the clarity that I seek from their birth now just like the feeling in the pit of my stomach I get when I think about how I couldn’t handle breastfeeding my twins alone (my husband had to go back to finish his deployment before the babies were a month old).

my body

I am strong because of this..not weak because my birth story is different.

For the longest time as a brand new mom, I felt judged for this and as though I never “fit” with the different types of moms. I wasn’t crunchy enough to friend the hardcore crunchy moms because I had a c-section and *GASP*…I formula fed, and because I had twins, many of the people I met didn’t understand what that meant. I felt alone in the beginning. Gradually things got better and I met some lovely moms that I talk to nearly every day. Now I realize that it doesn’t matter how my children were born, only that we were all safe and healthy, and that I played a role in making that happen. That makes me strong.

Check out this link to see my story where it was originally posted.


April Desktop Background

April Desktop Background

It’s April! Time to do a little Spring cleaning and change your desktop background! Click here to can grab your own copy! Or check out this post on how to customize your own!

April Desktop Background

Customize and organize your desktop with this background brought to you by Chaos&ChopSuey.

It’s LIVE on Ravelry!

mint 2

After a lot of work and help from my testers, my Mint Chocolate Chip Ice Cream Cone Slouchy Hat pattern is ready for purchase! You can check it out and purchase it here on Ravelry. Don’t forget to drop a heart while you’re there!

The first 100 people to purchase my pattern on Ravelry will receive a discount of $2.00 off using the coupon code: FIRSTPATTERNISUP

coupon code 1.jpg

Tag me on your creations with #chaosandchopsuey or #mintchocolatechipslouchy

Can’t wait to see what you create!

The Price of Pretty

I like glitter. Probably a little too much. My mom says I’ve always loved glitter…on everything. I also happen to like glue. I like scissors and tape and pretty paper. I love yarn and my sewing machine. I love beads and wire and buttons. Don’t forget about the buttons. And felt and fabric (but let’s skipping the ironing part of sewing, because really, who likes to iron?). These are the random things that make me happy and get the wheels turning in my head. I dream in crafty-vision.

b85f2c0632ad436d90684ed74deedfc6I grew up with an extremely crafty mother. I mean, seriously. I can remember my mom teaching me how to sew on her sewing machine with pieces of scrap fabric when I was little. Probably before I even started kindergarten. And then it was cross-stitch. And then it was following sewing patterns on my mother’s sewing machine. And then scrapbooking came into the picture. Then beading. It was a lot of fun having a mother that crafted. Sometimes we worked together, but sometimes it was nice to just go at it alone.

I know my love for creating things came from my mother. And I’m grateful that she shared that with me. Not only did I inherit her crafty her hands, but learned how to visualize and plan out a project from start to finish. She taught me how to have a vision and think outside the box to see it through. I learned perseverance. I gained confidence and self esteem with each project I finish and each obstacle I overcame.

df9b8b8d0a90f2199f73c2e492407890If you’re not a crafty person, you may not see these things in a finished piece of work, but a lot more goes into handmade items than just the basic materials. Sometimes it’s more than blood, sweat, and tears. Sometimes it’s a string of 4-letter words not meant for my toddlers’ ear and more tears. But there’s always love and passion put into handmade items. With your finished handmade item, you are receiving a bit of the artist behind it-the hours and hours it took perfecting their craft; the countless failed attempts at the final project (think: versions of technology that are released. There are ALWAYS prototypes.); and the time it took to create the item.


ee5f6ea56616da80a4e67888fca447ceBefore you hire an accountant, you make sure that they have the proper credentials. While the artist of a handmade item may not have earned a special degree to create the item, it doesn’t mean you should discount their experience any less. The next time you receive a handmade gift or gawk at the price tag on a handmade item, just remember that more goes into handmade items than materials.

Now that my mom and I live so far apart, we don’t have the opportunity to do crafty projects together often. But when she does come to visit, I ALWAYS have a project or two for us to work on. Same thing when I visit. Now that I am a mother myself, all three generations get to be crafty together! Hopefully I will pass on the same love and appreciation for handcrafted things to my children, if not the love for creating.

Happy crafting!

No-Bake Speckled Cupcakes

2015 was the year I declared I would learn a new skill–crochet. Likely if you are reading this, you’ve seen all the friggin adorable crocheted things on Pinterest (which is where my desire to learn this craft came from). Well, I did it. In July of 2015, I borrowed this book from the library (which I highly recommend if you’re a beginner or want to learn) and taught myself how to crochet.

dino and unicorn

Not wanting to make a million potholders and granny squares, I chose to make a unicorn by OneDogWoof for my little E. She loved it. Of course, T then wanted one for himself. So I tweaked the pattern a little bit and was able to come up with a dinosaur for him to love on. (They both picked out their colors.) Some say it was an ambitious first project, but I know if I didn’t have to think about HOW it works, I would have lost interest quickly.

These last few months have been a blast. I’ve been crocheting like crazy and making lots of fun things for everyone (more on those to come). I even joined a group on Facebook full of “hookers”(those who crochet because we use hooks!) for support, help, and ideas. The group belongs to Sarah Zimmerman, who is the brains behind Repeat Crafter Me.

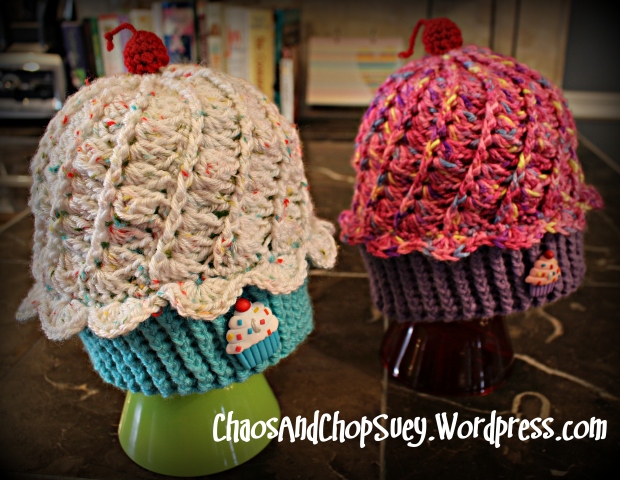
I recently shared my latest creation in the group, and the positive response was overwhelming! I mean, I had to plug my phone in because it was dying from all the notifications. Seriously, I’ve never had 800 people “like” something of mine. I promised I would share my pattern with all of those lovely ladies, so here it is. I used some of the Divine Hat pattern and inspiration from Sarah’s Cupcake Hat, but tweaked them to make them my own. Please bear with me as this is my very first time writing a pattern. Let me know if you find any mistakes!

No-Bake Speckled Cupcakes

Cupcake hats

Materials required:

J hook (6.0 mm)

Worsted weight yarn (Size 4)

-Frosting top takes less than 200 yards

-Cupcake liner takes less than 200 yards

-Scrap piece for cherry

**amounts used depends on the height required for your hat

Yarn needle to sew in ends

Little bits of yarn scraps or stuffing to fill cherry

Here’s what I used for my two hats:

Notes:

-Hat is worked from the top down. This pattern is worked in rounds that join at the end. Instructions are given in pattern to hide the chain 2 at the beginning of each round.

-Chain 2 at the beginning of rounds are not counted in the stitch count.

-Stitches used: Magic ring, SC, DC, FPDC, HDC, FPHDC, BPHDC, sc2tog, FPSC

-Gauge: Circle in Round 4 should measure approximately 3″ across. For child hat, with J 6.0mm hook, Round 4 should measure approximately 2.5″ across.

-The height of the hat can easily be adjusted by adding or subtracting final rows in both the frosting and the cupcake liner. If you make the pattern as written, it measures approximately 8″ from the top of the hat to the bottom of the brim (not including the cherry) and 9.5″ across the brim. (I’ve made 3 of these and they’ve all come out the same exact size).

-They are big on my 3.5 year olds and easily cover their ears (their heads both measure 20.5″). It fits a bit more snug on my head and stretches to fit, but covers my ears as well (my head measures 23″). So, big on a child, but snug on an adult if you want to know the size as written. If you go down a hook size, it would probably fit a bit better on a small child/big toddler. The next time I make one for myself, I’ll probably go up a hook or two. I don’t care for my hats being so snug.Pink Cupcake Hat

Frosting:

Round 1: Magic ring, chain 2, 15 DC, slip stitch to top of first DC and pull circle closed (this pushes the chain 2 to the back.) [15 DC]Round 1

Round 2: Chain 2, FPDC on every DC from round 1 to end. Slip stitch to top of first FPDC, not chain 2 (this pushes the chain to the back.) [15 FPDC]

Round3: Chain 2, FPDC on every FPDC from previous round, DC in space between every FPDC. Slip stitch to the top of the first FPDC, not chain 2. [15 FPDC, 15 DC]

Round 4: Chain 2, 1 FPDC on the same FPDC you slip stitched to in the previous round (this pushes the chain 2 to the back), 1 DC in the space between the FPDC you just made and the next DC from the previous round, skip 1 stitch. *1 FPDC on the previous round’s FPDC, 1 DC in the space between the FPDC you just made and the next DC from the previous round.* Repeat from * to * until the end of the round. Slip stitch to the top of the first FPDC, not chain 2 (this pushed the chain to the back). [15 FPDC, 15 DC]Round 4

Round 5: Chain 2, 1 FPDC on the same FPDC you slip stitched to in the previous round (this pushes the chain 2 to the back), 2 DC in the space between the FPDC you just made and the next DC from the previous round, skip 1 stitch. *1 FPDC on the previous round’s FPDC, 2 DC in the space between the FPDC you just made and the next DC from the previous round, skip 1 stitch.* Repeat from * to * until the end of the round. Slip stitch to the top of the first FPDC, not chain 2 (this pushed the chain to the back). [15 FPDC, 30 DC]

Round 6: Chain 2, 1 FPDC on the same FPDC you slip stitched to in the previous round (this pushes the chain 2 to the back), 2 DC in the space between the FPDC you just made and the next DC from the previous round, skip 2 stitches. *1 FPDC on the previous round’s FPDC, 2 DC in the space between the FPDC you just made and the next DC from the previous round, skip 2 stitches.* Repeat from * to * until the end of the round. Slip stitch to the top of the first FPDC, not chain 2 (this pushed the chain to the back). [15 FPDC, 30 DC]

Round 7: Chain 2, 1 FPDC on the same FPDC you slip stitched to in the previous round (this pushes the chain 2 to the back), 3 DC in the space between the FPDC you just made and the next DC from the previous round, skip 2 stitches. *1 FPDC on the previous round’s FPDC, 3 DC in the space between the FPDC you just made and the next DC from the previous round, skip 2 stitches.* Repeat from * to * until the end of the round. Slip stitch to the top of the first FPDC, not chain 2 (this pushed the chain to the back). [15 FPDC, 45 DC] **NOTE: This is usually the round where the edges start to curl up. Not a big deal. You will get them to lay straight at the end.**

Round 8: Chain 2, 1 FPDC on the same FPDC you slip stitched to in the previous round (this pushes the chain 2 to the back), 3 DC in the space between the FPDC you just made and the next DC from the previous round, skip 3 stitches. *1 FPDC on the previous round’s FPDC, 3 DC in the space between the FPDC you just made and the next DC from the previous round, skip 3 stitches.* Repeat from * to * until the end of the round. Slip stitch to the top of the first FPDC, not chain 2 (this pushed the chain to the back). [15 FPDC, 45 DC]

Round 9: Repeat round 8.

Round 10: Chain 2, 1 FPDC on the same FPDC you slip stitched to in the previous round (this pushes the chain 2 to the back), 4 DC in the space between the FPDC you just made and the next DC from the previous round, skip 3 stitches. *1 FPDC on the previous round’s FPDC, 4 DC in the space between the FPDC you just made and the next DC from the previous round, skip 3 stitches.* Repeat from * to * until the end of the round. Slip stitch to the top of the first FPDC, not chain 2 (this pushed the chain to the back). [15 FPDC, 60 DC]

Round 11: Chain 2, 1 FPDC on the same FPDC you slip stitched to in the previous round (this pushes the chain 2 to the back), 4 DC in the space between the FPDC you just made and the next DC from the previous round, skip 4 stitches. *1 FPDC on the previous round’s FPDC, 4 DC in the space between the FPDC you just made and the next DC from the previous round, skip 4 stitches.* Repeat from * to * until the end of the round. Slip stitch to the top of the first FPDC, not chain 2 (this pushed the chain to the back). [15 FPDC, 60 DC]

Round 12-15: Repeat Round 11. Add more rounds for a more slouchy hat. To accommodate an adult, I would work up a few more rounds adding 5 DC to the space. This will change the stitch count going around the hat for the entire rest of the pattern since you are making it bigger and adding stitches. Don’t worry. It’s the same idea, just with more stitches. Easy adjustment.

Round 16: Chain 1, HDC in same stitch as chain. Continue working HDC around the hat. Slip stitch to first HDC. [75 HDC]

Round 17: Chain 1, FPSC in same stitch as chain1. FPSC around each HDC from the previous round. This pushes the bottom edge of the previous round to the inside of the hat which is where you will be attaching the cupcake liner. Slip stitch to the beginning FPSC. [75 FPSC]

Round 18: Scalloped edge is worked IN THE ROW CREATED WITH ROUND 17 (the v stitches that sit on the OUTSIDE of the hat.) Chain 1. SC in same stitch as chain 1. *Skip 2 stitches. Work 8 DC in the third stitch. Skip 2 stitches. SC in the third stitch.* Repeat *to* all the way around, ending with a slip stitch into the SC at the beginning of the round instead of the last SC of the series. [12 scallops]

***NOTE*** If you are making this hat smaller than written here and stopped the spiral rows earlier than the pattern, you will most likely need to make the scallops smaller to accommodate the size difference. I have not tested this theory, so you will have to be the judge on that. Let me know if you do and I’ll tack the modification on! Same goes for making the hat bigger.

Round 19: Chain 1. Work 1 SC in every stitch. Slip stitch to the first SC. Finish off and break yarn. Weave in ends.

Cupcake Liner:

Round 1: Using cupcake liner yarn, attach yarn anywhere on the edge UNDER the scallop flaps with a slip stitch. To find this spot, fold back the scallops so they are now sandwiched between you and the rest of the hat. Chain 1, HDC in same stitch as chain 1. HDC all the way around. Slip stitch to the first HDC of the round.

Round 2-8: Chain 2, FPHDC in stitch. BPHDC in next stitch. Repeat FP+BP HDC pattern all the way around. Slip stitch to first FPHDC. Add or subtract rows as necessary to achieve your desired outcome. Finish off and break yarn. Weave in ends.

Cherry:

Using red yarn for cherry…

**Rounds for cherry are worked in continuous rounds without joining.

Round 1: Magic circle, chain 1, 6 SC in Magic Circle. [6 SC]

Round 2: 2 SC in each SC from the previous round. Using your tapestry needle, move the leftover tail from your magic circle through the very center of the magic circle so that it now hangs on the right side of the cherry. This will be your stem. DO NOT CUT THIS YET! I like to tie a little slip knot on the wrong side of the cherry as this keeps the stem centered rather than being pulled into one of the SC s in the magic circle. [12 SC]

Round 3: *2 SC in next stitch, 1 SC in next stitch.* Repeat from *to* 6 times. [18 SC]

Round 4:*2 SC in next stitch, SC in next 2 stitches.* Repeat from *to* 5 times. [24 SC]

Round 5-7: 1 SC in each stitch. [24 SC]

Round 8: *SC in next 2 stitches, sc2tog in next.* Repeat from *to* 7 times. [16 SC, 8 sc2tog]

Round 9: *1 SC in next stitch, sc2tog in next.* Repeat from *to* 9 times. [9 SC, 9 sc2tog]

Round 10: Fill cherry with fiberfill or yarn scraps. *1 SC in next stitch, sc2tog in next.* Repeat from *to* 2-3 times. Fasten off and close cherry, leaving a long piece of yarn to attach cherry to top of hat.

Attach cherry to top of hat and weave in end. Tie a knot about 1-2 inches from the top of the cherry in the tail you pulled through the magic ring. Cut yarn after knot and you’ve made your cherry stem!

End Notes:

Use this pattern ’til your heart’s content. All I ask is that you do not use my own photos as your own, link back to me with your work, and don’t cut and paste the pattern as your own. Just link back to me. Please. Oh, and you can always follow me on Facebook or Pinterest or Instagram or Twitter or Tumblr.

I love to see your photos!! Tag me on Facebook (@Chaos & Chop Suey) with your finished masterpieces or share them on my Facebook wall!