I Otterly Love You

One of my favorite YouTube videos is of a pair of sea otters floating around holding hands. It’s just sooo gosh darn cute. And yes, they actually do hold hands. It helps keep them from drifting apart while they’re floating around.

It seems that sea otters have worked their way into popular culture lately. A quick search on Etsy alone pulls up over 2,000 results.  One of my favorites is this super cute enamel “You’re My Significant Otter” pin sold by Tiny Bee Cards on Etsy:

il_570xN.1234371656_gi97

So when I  asked to test an amigurumi pattern of a sea otter, I jumped at the chance! Tommy over at Snips And Stitches Shop on Etsy recently released his Emmet the Otter crochet pattern and it is just too cute. I love making amigurumi–they’re usually smaller projects (in comparison to my graphgans) and easy to do while on-the-go. My Emmet the Otter was worked up using my favorite–I Love This Yarn line from Hobby Lobby.

IMG_6589.JPG

Happy Fall!!!

Fall is my time of the year. I love seeing all the leaves changing colors. It truly is a magical sight to see. I grew up in Hawaii where there is no fall. When I moved away from the islands at 25 years old, I immediately fell in love with the drop in temperature and the beautiful colors of fall. One of my favorite things to do is have a glass of hot apple cider and sit by the firepit in our backyard with a campfire going–all while wearing a sweater. Now, because of where I live, our fall is short (sometimes you can wear shorts on Thanksgiving), but that just means I savor every moment.

To celebrate the first day of fall, I have designed a few fall themed graphing panels that you can grab for free, right here on my blog.

Like I said earlier, I love hot apple cider. Don’t throw rocks at me, but I don’t understand the love for pumpkin spice lattes. My husband loves them, but I’d rather have some hot apple cider. So, the panel I chose to work up is my Hot Apple Cider. I plan on turning this into a fall throw pillow for my living room–it’s the perfect size!

hot apple cider.jpg

For those of you who are PSL fans, don’t worry, I’ve got you covered:

PSL graph

Just because I’m not a PSL fan, doesn’t mean I don’t like pumpkin! I love pumpkin pie!

Pumpkin graph

These graphs are the perfect size for making a seasonal throw pillow or two. Or, if you’re feeling ambitious, you could always arrange them in a grid and make a small lap blanket!

fall throw

To grab your FREE copy of my FALL TRIO graphs, just click on this link. It’ll take you to a Google Drive document that you can download at your leisure.

I can’t wait to see what you come up with! Be sure to tag me (#ChaosAndChopSuey) in your photos so I can check them out (and possibly feature)!

#ChaosAndChopSuey

Happy Fall y’all!

<3, Angela

Wonder Woman Headpiece Crochet Pattern

wonder-woman-embargo-lift-image-header-236509-1280x0

My daughter LOVES Wonder Woman. She hasn’t even seen the movie (she’s only 5) but somehow she knows that Wonder Woman can kick some booty. So last night I grabbed a hook and some yarn and started coming up with a very simple headpiece for her to wear around the house. When she woke up this morning, she was ecstatic to find a headpiece for her just like Wonder Woman’s.

IMG_5355.JPG

MATERIALS

IMG_5269-Size H (5.0mm) crochet hook (I used my custom #BossBabe ergonomic Clover crochet hook made by Chloe Rebecca Boutique, because seriously, how fitting is it to use a #BossBabe hook to make anything Wonder Woman related?)

-Yarn (I used Hobby Lobby’s I Love This Yarn in SUNGOLD and GRAPHITE)

-Elastic Hair Tie

-Scissors

-Yarn Needle

PATTERN

Row 1: leaving a long tail in the beginning, chain until you reach your desired length (from middle of forehead around to the back of head so that both ends of the chain just touch each other.

Row 2: SC in second chain from hook and every chain across. Ch 1, turn.

Row 3: SC across. Ch 1, turn.

Row 4-5: Repeat row 3. Fasten off leaving a tail long for joining hair elastic.

Band detail: using GRAPHITE, join on front side of band between row 2 and 3. Surface stitch (slip stitch) the length of the band. At the end, chain 1, turn, continue slip stitching around the entire edge of band taking care to slip stitch+chain 1+slip stitch in each corner. **NOTE: Leave long SUNGOLD tails hang while doing the detail slip stitch round.** Fasten off and weave in GRAPHITE ends.

full band

Add Elastic Hair Tie: Fold over one end of band (wrong sides together) and sew the edge to the band tucking the elastic band in the fold. Secure tightly. Repeat for the opposite end of band.

Front Triangle Detail: With SUNGOLD and this pattern, make a triangle of your desired length (I made 11 rows using this pattern ). Once the desired length is achieved, chain 2 and HDC down one side, 2 HDC+chain 2+2HDC in the bottom tip of triangle, HDC up the other side of triangle. Fasten off and weave in ends.

Triangle detail

Using GRAPHITE, join at the top left corner of your upside down triangle and slip stitch along the next two sides. Fasten off and weave in ends. Using GRAPHITE, join at the top left corner of your upside down triangle between the triangle and the HDC row. Slip stitch along that line to create a second “V” detail inside the first slip stitch detail you just finished. Fasten off and leave a long tail for sewing. Attach your triangle detail centered on your band. Before weaving in end, add additional star detailing to the center of triangle.

Close up.jpg

IMG_5353

Happy Hooking!

Car Organizers

I pride myself on not being a messy person. Like, I probably should have sought some professional help with this at some point in my past because I do think about organizing and rearranging things more than I probably should. But, it doesn’t keep me up at night and it doesn’t usually stop me from being productive (unless I have one of those rare ‘I must empty every cabinet in the kitchen to purge and rearrange’ moments), so I just embrace it.

This is the back of my van. Well, was the back of my van. Not too bad, right? Well, it drove me crazy. I felt like there was just so much stuff in the van with the big pink milk crate full of the essentials (extra clothes, towels, blanket, wipes…just stuff you need with two young kids). So, I wanted to do something about it.

IMG_3652

I had previously made these pretty striped things to put on the seats when my kids were rear-facing in their carseats so their feet wouldn’t get the actual seats in my car covered in grossness. Since they’re now facing the front of the van, I no longer need them. So, I decided not to let them go to waste and added mesh pockets to them.

IMG_3649

My mom was visiting when I did this and she helped me out by ripping the edging off of both of these so I could hide the edges of the mesh under them along the edges. I hate using my seam ripper, so I’m glad she was here to help me with it.

IMG_3650

Since the third row of my van is almost never up and in use, I attached these seat organizers to the back of my second row seats. Voila! I was able to get rid of that pink milk crate and still have the things I need with us. They’re not the easiest to get to (you can’t reach them unless you get into the back of the van), but since the stuff in there is just for ‘in case of,’ it’s fine. Much better. The clutter look from before isn’t there anymore.

IMG_3655


DIY Yoga Mat Bag

So I’ve started taking yoga. It’s now part of my weekend routine and I freaking love it. It started with me wanting to check out a yoga studio near my house that offers free childcare during classes, but when I went to look up class time info, I found out that the studio had closed down 😞 Anyway, it ended up with me and two of my girlfriends hitting the studio that one of them already attended.


13754566_10208188723929746_2115854916917643698_nMy first ‘not-in-your-living-room-using-a-video’ yoga class was a Hot Flow class and now, that’s all I want to do. Something about sweating profusely during yoga is intoxicating and you become addicted almost immediately. I am not exaggerating when I say that I could literally wring out every article of clothing and my sweat towel after class was over. But it felt fan-freaking-tastic.

Insert the craftaholic’s thought process:

  1. Start doing hot yoga.
  2. Realize hot yoga creates a good amount of sopping wet…things.
  3. Decide I need something to cart these sweaty things back and forth.

Now, the average person would say, “Hey, I’ve got a bag I can use to do this.” Done. That’s it. That’s the end of their thought process. I don’t understand that simplicity, but to each their own. No, when you’re a craftaholic, you spend an hour perusing Pinterest trying to find the *perfect* tutorial for the bag you must have for this new activity . I had to have pinned a dozen different prototypes, but finally narrowed it down to just a few:

Screenshot (2)

Well, obviously, the next step was to take out my sewing machine and hit up my fabric stash so I could get started right away. (And my husband wonders how it is that I can get distracted so easily…pssshh, you really have no idea honey.) Nevermind the fact that there were 4 loads of laundry that were waiting to be done, I had to do this right away (even though I had a good couple of days before my next yoga class). I found a big panel of fabric that was perfect for the outer layer and the straps, but the inner lining was another story. Let me tell you, I did not plan on piecing together and patchworking 2 entire inner panels, but when you have no matching fabric in the large size you need, you make do. I think the inside turned out kinda cool and goes with the rainbow stripes of the exterior. I mean, I did Pin a patchwork style bag for this project inspiration.

IMG_3644

Inside patchwork panel with 2 pockets.

I used this tutorial here and modified it just a little to suit my needs. My modifications:

  1. I did not use the webbing for straps like the tutorial suggests, but used matching fabric that I made into straps.
  2. I added an exterior pocket like this adaptation to the original pattern did with a Kam Snap to close it.
  3. I also added an interior pocket that is divided down the center, making it into 2 pockets with Kam Snaps to close them.
  4. I thought the top side seams collapsed a ton when I was wearing the bag, so I added a Kam Snap on the seams on either end of the bag to give it a little bi-fold look. It can easily be unsnapped if I need to.

And, voila! I’m done! I’m excited to use it this weekend!

IMG_3641

Speckled Cupcake Revamp

A few months ago I made a matching (but coordinating) set of my No-Bake Speckled Cupcake hats for my almost-4-year-old twins. They love the heck out of their hats and were none too pleased when I had to put them away at the end of winter.

Cupcake hats
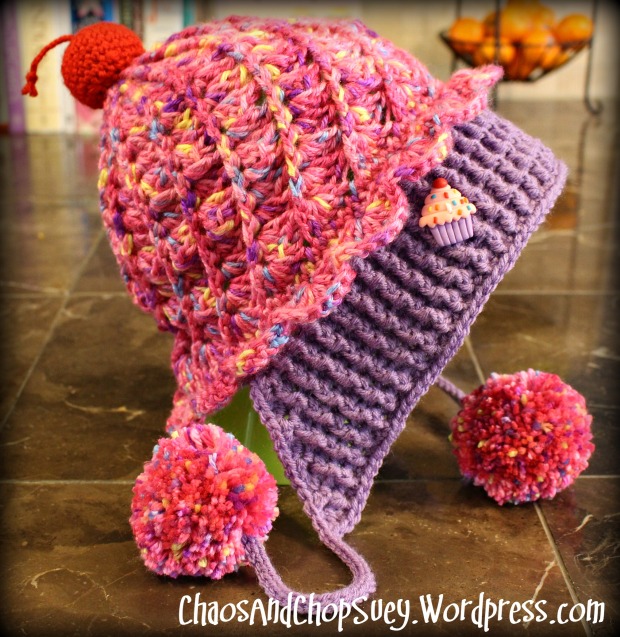
I originally made one for myself following the same pattern, but the more I wore it, the more I realized that the pattern was not the right fit for me. Not only was it too small for my big head , I realized that I am just not a full-brim winter hat kinda gal. So, I ripped it apart and remade one that suited me a bit more.

Using the same pattern as my original No-Bake Speckled Cupcake hat pattern, here are the modifications I made to fit me a bit better.

**NOTE** If the original is too small for your adult head, try these modifications. You can always do the original full brim, but the difference in hook size and adding extra rows makes for a looser fit on my 22″ head.

NOTES

  • Icing hook size: K (6.5 mm)
  • Cupcake Liner hook size: J (6.0 mm)

ICING

  • Using a K (6.5 mm)  hook:
  • Work the pattern the same all the way up to the end of Round 15. That means, finish Round 15 and add the following rounds:
    • Extra Round A: Chain 2, 1 FPDC on the same FPDC you slip stitched to in the previous round (this pushes the chain 2 to the back), 5 DC in the space between the FPDC you just made and the next DC from the previous round, skip 4 stitches. *1 FPDC on the previous round’s FPDC, 5 DC in the space between the FPDC you just made and the next DC from the previous round, skip 4 stitches.* Repeat from * to * until the end of the round. Slip stitch to the top of the first FPDC, not chain 2 (this pushed the chain to the back). [15 FPDC, 75 DC]
    • Extra Round B: Chain 2, 1 FPDC on the same FPDC you slip stitched to in the previous round (this pushes the chain 2 to the back), 5 DC in the space between the FPDC you just made and the next DC from the previous round, skip 5 stitches. *1 FPDC on the previous round’s FPDC, 5 DC in the space between the FPDC you just made and the next DC from the previous round, skip 5 stitches.* Repeat from * to * until the end of the round. Slip stitch to the top of the first FPDC, not chain 2 (this pushed the chain to the back). [15 FPDC, 75 DC]
    • Extra Round C: Repeat Extra Round B.
    • Pick up the original pattern and complete Round 16 to the end of the icing pattern.

cupcake slouchy 3

CUPCAKE LINER

**NOTE** You will be turning at the end of each row, so sometimes you will be working on the wrong side (WS) of the hat. That means when you are on the WS, the INSIDE of the hat is facing you. Pattern indicates whether you are on the RS (right side) or WS (wrong side) in case you lose track.

  • Switch to a J (6.0 mm) hook
  • Row 1: Using cupcake liner yarn, attach yarn anywhere on the edge UNDER the scallop flaps with a slip stitch. To find this spot, fold back the scallops so they are now sandwiched between you and the rest of the hat. Chain 1. *FPHDC in next stitch. BPHDC in next stitch.* Repeat *to* 33. FPHDC. Chain 1, turn. [69 stitches]
  • Row 2: (WS) 2 HDC in first stitch. *FPHDC in next stitch. BPHDC in next stitch.* Repeat to end. 2 HDC in last stitch. Chain 1, turn.
    • **NOTE** Make sure your FPHDCs and BPHDCs are lining up on top of each other so they create these ridges. That means a FPHDC from the previous round will have a BPHDC worked on it in the current round. Same thing for BPHDC from the previous round–the opposite, a FPHDC will be worked on those stitches in the current round. This is because you are turning your work at the end of the rounds

12874652_10154126944724916_376301680_o (1) (1)

  • Row 3: (RS) 2 HDC in first stitch. *BPHDC in next stitch. FPHDC in next stitch.* Repeat *to* to end. 2 HDC in last stitch. Chain 1, turn.
  • Row 4: (WS) 2 HDC in first stitch. FPHDC in next stitch. *BPHDC in next stitch. FPHDC in next stitch.* Repeat *to* to end. 2 HDC in last stitch. Chain 1, turn.
  • Row 5: (RS) Repeat Row 4.
  • Row 6: (WS) Repeat Row 4.
  • Row 7: (RS) Repeat Row 4.

**NOTE** Check for sizing at this point. I like these half brims to extend from my head a bit like a bill on a hat, so I kept going for another 2 rows. If I were making it for my kids, I would have stopped after Row 7.

  • Row 8: (WS) Repeat Row 4
  • Row 9: (RS) Repeat Row 4.
  • Final round: (RS) Turn hat sideways and evenly work SC along the side of brim. Continue SC in every stitch (keep these stitches slightly looser than you would normally!—If you are making an adult sized hat, you are using a smaller hook than what you made the top of the hat with!) along the back side of the hat where there is no brim. Turn hat sideways again and evenly work SC along the opposite side of the brim. When you get to the corner of the brim, chain 30. In the 4th chain from the hook, work a slip stitch into the back loop only. Continue working a slip stitch in the back loop for the length of the chain. Turn hat sideways again and continue working an SC in every stitch along the long edge of the brim. When you get to the corner of the brim, chain 30. In the 4th chain from the hook, work a slip stitch into the back loop only. Continue working a slip stitch in the back loop for the length of the chain. At the base of the chain, slip stitch to the first SC of the final round. Finish off and break yarn. Weave in all ends.
  • Attach a pompom to loops created on ends of both chain-slip stitch combo.
  • Follow the original pattern for the CHERRY information.

cupcake slouchy 2

END NOTES

Use this pattern ’til your heart’s content. All I ask is that you do not use my own photos as your own, link back to me with your work, and don’t cut and paste the pattern as your own. Just link back to me. Please. Oh, and you can always follow me on Facebook or Pinterest or Instagram or Twitter or Tumblr.

I love to see your photos!! Tag me on Facebook (@Chaos & Chop Suey) with your finished masterpieces or share them on my Facebook wall!

cupcake slouchy 4


Chocolate or Vanilla?

In our house, one of our favorite spots for a special treat is at our local frozen yogurt shop. This is the kind of shop that allows you to pick your own yogurt from at least 16 different flavors and about a bajillion different toppings. The combinations are limitless, so of course, when you bring two 3-year olds with you, the process of selection takes longer than the actual act of eating the sweet treat.

Swirl hatIt’s been a while since we started frequenting the shop so my kids are veterans of this ordeal. My kids even discuss their options before we get there. E tends to pick fruity flavors of yogurt and tops her yogurt with fruit and mochi balls. T’s yogurt pick is always a surprise and he wants the wackiest flavor combinations. His choice of toppings? Mochi balls and chocolate. Lately though, they’ve been on this kick of trying the swirled flavors.

swirl hat 3This brings flashbacks to the early 90’s–soft serve ice cream cones. Or frozen yogurt. I don’t quite remember the difference since I was only a wee little one. Anyway, that swirled frozen treat on a cone. Following me? I know for a fact that I ALWAYS chose the chocolate and vanilla swirl. I am a huge vanilla fan, but I know if I could have BOTH and not have to choose, I always went with the swirl. Enter, my chocolate and vanilla swirl cone hat.


This hat was made for my daughter using my Mint Chocolate Chip Ice Cream Cone Slouchy Hat pattern in the child’s size and some tedious color changes, but she is so adorable wearing it and absolutely loves it. Of course, my son wants one now, buuuuut winter is sadly over. We’ll see young man.

swirl hat 2


The Price of Pretty

I like glitter. Probably a little too much. My mom says I’ve always loved glitter…on everything. I also happen to like glue. I like scissors and tape and pretty paper. I love yarn and my sewing machine. I love beads and wire and buttons. Don’t forget about the buttons. And felt and fabric (but let’s skipping the ironing part of sewing, because really, who likes to iron?). These are the random things that make me happy and get the wheels turning in my head. I dream in crafty-vision.

b85f2c0632ad436d90684ed74deedfc6I grew up with an extremely crafty mother. I mean, seriously. I can remember my mom teaching me how to sew on her sewing machine with pieces of scrap fabric when I was little. Probably before I even started kindergarten. And then it was cross-stitch. And then it was following sewing patterns on my mother’s sewing machine. And then scrapbooking came into the picture. Then beading. It was a lot of fun having a mother that crafted. Sometimes we worked together, but sometimes it was nice to just go at it alone.

I know my love for creating things came from my mother. And I’m grateful that she shared that with me. Not only did I inherit her crafty her hands, but learned how to visualize and plan out a project from start to finish. She taught me how to have a vision and think outside the box to see it through. I learned perseverance. I gained confidence and self esteem with each project I finish and each obstacle I overcame.

df9b8b8d0a90f2199f73c2e492407890If you’re not a crafty person, you may not see these things in a finished piece of work, but a lot more goes into handmade items than just the basic materials. Sometimes it’s more than blood, sweat, and tears. Sometimes it’s a string of 4-letter words not meant for my toddlers’ ear and more tears. But there’s always love and passion put into handmade items. With your finished handmade item, you are receiving a bit of the artist behind it-the hours and hours it took perfecting their craft; the countless failed attempts at the final project (think: versions of technology that are released. There are ALWAYS prototypes.); and the time it took to create the item.


ee5f6ea56616da80a4e67888fca447ceBefore you hire an accountant, you make sure that they have the proper credentials. While the artist of a handmade item may not have earned a special degree to create the item, it doesn’t mean you should discount their experience any less. The next time you receive a handmade gift or gawk at the price tag on a handmade item, just remember that more goes into handmade items than materials.

Now that my mom and I live so far apart, we don’t have the opportunity to do crafty projects together often. But when she does come to visit, I ALWAYS have a project or two for us to work on. Same thing when I visit. Now that I am a mother myself, all three generations get to be crafty together! Hopefully I will pass on the same love and appreciation for handcrafted things to my children, if not the love for creating.

Happy crafting!

Ice Cream is Coming!

mint 2

Who says you can’t have ice cream in the middle of winter? I don’t think I can be friends with those kinds of people. It’s just wrong. There should be no rules when it comes to ice cream. Heck, the best part of having your wisdom teeth pulled is getting to eat ice cream for 4 days straight. If I’d thought it through a little more when I was 16 years old, I would have said, “Sure,” to having my teeth pulled out on numerous days.

Note to self: If I ever hop in a time machine and go back to my 16 year old self, I’ll remind myself to say, “Yes,” when they ask me if I want to have my teeth pulled out over several days.

626c277b1e449aa5d26846860fb1206cd8cf273ec808736604328769be7e1bd8

Photo via quickmeme.com

My mint chocolate chip ice cream cone hat turned out even better than I had envisioned. As we wait for the finishing touches and testing to be completed for this pattern, follow me on this blog or my Facebook page so you will be first to know when this pattern is released. Stay warm!

mint 1