I love to organize. Nothing says party time like completely emptying out a closet and reorganizing it. In your pajamas. At 2am. Organization keeps me sane. Something about the instant gratification you get when you conquer that mess (well, in my mind, it’s a mess, but not so much to other people).
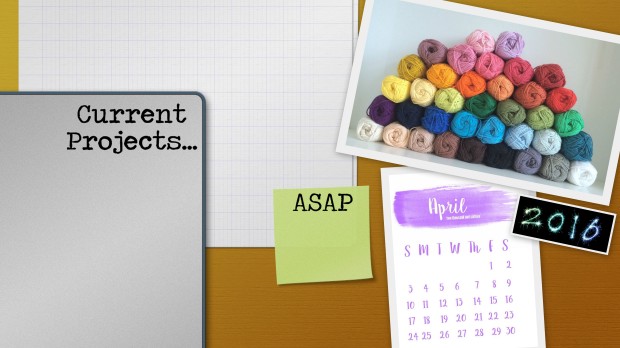
I cannot stand the randomness of icons on a computer’s desktop. Nor do I want to have a screen with zero icons (like my husband). I found a happy medium. An organizational desktop background. I even add the current monthly calendar because I never know what day it is (hence the year on it as well. Something about being a stay-at-home-mom throws you in a time-warp where you have no idea what day it is without a calendar).
My actual desktop is slightly different–I have a family photo in the top left corner, but you all don’t want to see that :) I had several requirements when it came to finding something that worked for me. I wanted clean lines and a simplistic look. I also wanted dedicated spaces for various categories.
- I needed a space for projects that I am currently working on, from editing photos, to blog info, to scrapbooking, and school work (working on my MBA right now).
- I needed a space for things that needed immediate attention like a paper for school that I’m working on, or as you can see right now, the user manual for my new camera that I am DETERMINED to learn how to fully use. Also, the calligraphy folder on there…that’s my New Year’s “goal for the year” for 2016.
- I needed a monthly calendar that I could change out as needed.
- And I wanted a space to keep the crochet projects that I am either currently working on, or next in line.
 After searching good old Google, I came across this lovely simple background. It has good bones and the look I wanted. You can find it here in several different sizes.
Same thing for the calendar, 2016 date, and yarn stack photos. Thank you Google.
Now, I don’t have any fancy editing software or anything. I just use Picasa. If your computer doesn’t have it, you can download it for free here. I have a PC, so if you have a MAC, sorry, but I don’t know anything about Apple products.
I tried my best to create a visual step-by-step guide on how to do this for yourself. Hope this helps!
- Step 1: Once your photos you are going to use are downloaded to your computer, open up Picasa. Make sure that your photos are linked to Picasa (that the files have been added if you do not have them automatically available to Picasa). Select the photos you want to use in your collage (hold down CONTROL to select more than one photo).
- Step 2: Select ‘Create Photo Collage.’ This will take you to a new page within Picasa.

- Step 3: Select which photo is going to be your background. Right click on it and ‘set as background.’ This will fill the background with that photo.

- Step 4: The little version of the background photo will still be there. Just right click on it and ‘remove’ it.
- Step 5: Click on ‘Setting’ to bring you back to an editing screen.

- Step 6: Pick a border on the settings screen. I use the ‘plain white border’ on all of the photos that I lay on top of my background. I just like the crisp clean edge.

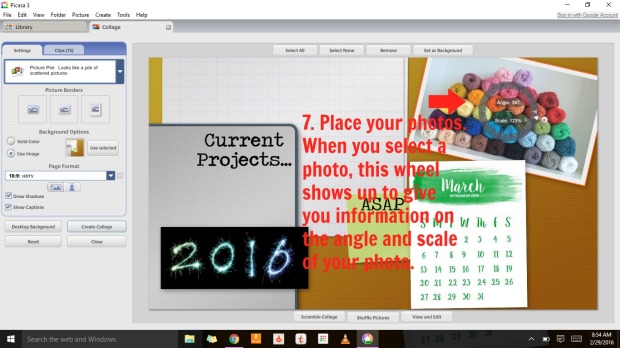
- Step 7: Now it’s time to resize and place your photos. It’s as simple as dragging, dropping, and resizing. This little wheel pops up in the middle of your photo when you select it. Grab the little red dot on the side of it to adjust the angle and scale. Do this for all your photos.
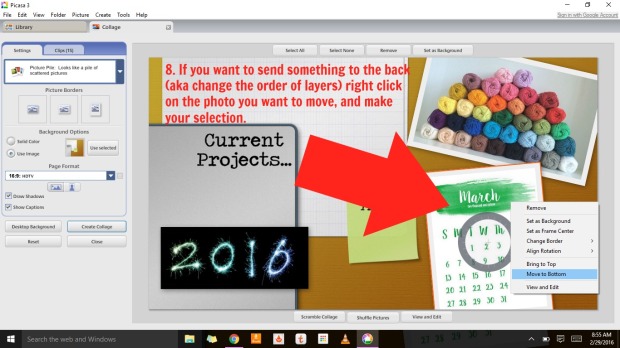
- Step 8: To send a layer to the back (or bring a layer to the top), right click on the photo and make your selection. In this example, I chose to send the calendar to the back so the top right corner would be tucked under the yarn photo.
- Step 9: Once everything is in place, click on ‘Create Collage.’ This will take you to the editing screen where you will be adding text. (I realized as I was doing this that my background already has text on it. That’s because I added the text to the plain background and saved it so that I didn’t have to do the text boxes every month when I changed out the calendar.)

- Step 10: To create a text box, select ‘Text.’

- Step 11: Write your text. To create more text boxes, hit ‘Apply’ after finishing each text box and the option to add another text box will be available. You can change the font and size and all that jazz here. To move the text boxes and resize them is easy-it’s done just like the photos in an earlier step!
- Step 12: Click ‘Back to Library.’

- Final step: SAVE YOUR WORK!! And now you can set your work as your desktop background!

If you want to eliminate doing every step for every month, just create a generic template WITHOUT the calendar. That’s what I do. I have every step done as shown above, but I leave out the calendar. That way, when I change out the background every month, the only thing I need to edit is to add the calendar to the layers and save. Simple.
If you really liked this month’s, here it is for you for free. Enjoy!

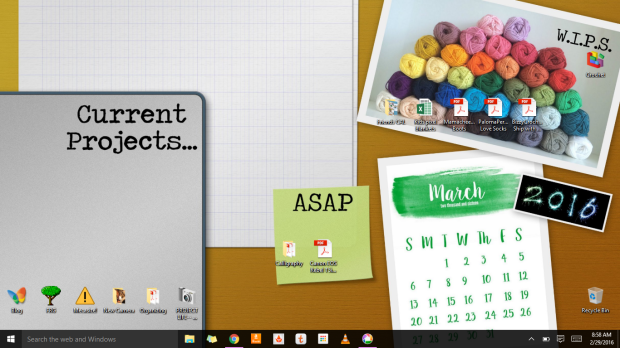
March 2016 Desktop Background