Wonder Woman Headpiece Crochet Pattern

wonder-woman-embargo-lift-image-header-236509-1280x0

My daughter LOVES Wonder Woman. She hasn’t even seen the movie (she’s only 5) but somehow she knows that Wonder Woman can kick some booty. So last night I grabbed a hook and some yarn and started coming up with a very simple headpiece for her to wear around the house. When she woke up this morning, she was ecstatic to find a headpiece for her just like Wonder Woman’s.

IMG_5355.JPG

MATERIALS

IMG_5269-Size H (5.0mm) crochet hook (I used my custom #BossBabe ergonomic Clover crochet hook made by Chloe Rebecca Boutique, because seriously, how fitting is it to use a #BossBabe hook to make anything Wonder Woman related?)

-Yarn (I used Hobby Lobby’s I Love This Yarn in SUNGOLD and GRAPHITE)

-Elastic Hair Tie

-Scissors

-Yarn Needle

PATTERN

Row 1: leaving a long tail in the beginning, chain until you reach your desired length (from middle of forehead around to the back of head so that both ends of the chain just touch each other.

Row 2: SC in second chain from hook and every chain across. Ch 1, turn.

Row 3: SC across. Ch 1, turn.

Row 4-5: Repeat row 3. Fasten off leaving a tail long for joining hair elastic.

Band detail: using GRAPHITE, join on front side of band between row 2 and 3. Surface stitch (slip stitch) the length of the band. At the end, chain 1, turn, continue slip stitching around the entire edge of band taking care to slip stitch+chain 1+slip stitch in each corner. **NOTE: Leave long SUNGOLD tails hang while doing the detail slip stitch round.** Fasten off and weave in GRAPHITE ends.

full band

Add Elastic Hair Tie: Fold over one end of band (wrong sides together) and sew the edge to the band tucking the elastic band in the fold. Secure tightly. Repeat for the opposite end of band.

Front Triangle Detail: With SUNGOLD and this pattern, make a triangle of your desired length (I made 11 rows using this pattern ). Once the desired length is achieved, chain 2 and HDC down one side, 2 HDC+chain 2+2HDC in the bottom tip of triangle, HDC up the other side of triangle. Fasten off and weave in ends.

Triangle detail

Using GRAPHITE, join at the top left corner of your upside down triangle and slip stitch along the next two sides. Fasten off and weave in ends. Using GRAPHITE, join at the top left corner of your upside down triangle between the triangle and the HDC row. Slip stitch along that line to create a second “V” detail inside the first slip stitch detail you just finished. Fasten off and leave a long tail for sewing. Attach your triangle detail centered on your band. Before weaving in end, add additional star detailing to the center of triangle.

Close up.jpg

IMG_5353

Happy Hooking!

Baseball Lover

Baseball Flower 1I never watched baseball growing up. Neither of my brothers played baseball. Where I grew up, there were no professional baseball teams (well, no professional sports teams, period). I was practically a baseball virgin. Then I met my husband who is a big baseball fan. We didn’t frequent games, but traveled a few hours away to see the closest minor league MLB team once in a while. When we lived close to a big city a few years ago, my husband went to an MLB game at least once a month and when we had visitors in town. We even took our little 18-month old twins to see the big city MLB team play.

Living near a big city with professional sports teams does something to you. We didn’t watch much tv, but we would put the local channel on the television whenever they were broadcasting our home team’s MLB games. That big city feel made me really enjoy watching baseball. Now that my family is back in a smaller town without any professional sports teams, I miss being able to watch or attend these events, because they’re a lot of fun. We did find a small summer league that plays baseball in our town, and our kids (who are 4 years old) love going to watch those games. Every weekend they ask if we’re going to watch a baseball game that night.

My family was fortunate enough to win some tickets to a super special MLB game that’s happening this weekend. A special field was built and stadium seating erected just for this one game. And in our town! Needless to say, we are ECSTATIC about going. As much as I love watching baseball, I seem to not own a single piece of baseball swag. So, what’s a girl to do? I whipped up a little headband for myself with a 3-tiered flower with the center of the top flower resembling a baseball.

Baseball Flower 3

Materials:

Yarn, hook, needle

*I used worsted weight yarn, but you can use whatever you want. Just make sure that your hook corresponds to whatever weight you use.

For the band, using white yarn and the star stitch pattern, I made 3 complete rows of star stitches (the pattern for star stitch is comprised of 2 rows, so I actually made a total of 6 rows). Make this is as long as you want (mine is about 14 inches long), but keep in mind that you’re adding a loop to each of the ends so you can fasten it behind your head.

star stitchband.jpg

Once that white band was done, I switched to my red yarn and made my ends. Now, my ends are not clear on directions, nor did I take any notes, but here’s a photo of what I did–just a basic decrease, but when I got down to 5 stitches across, I chained 5, and slip stitched to end of the row (skipping the stitches in the row) so I had a little loop on the end. Do this for both short ends of your white band. Then, when that was all done, I single crocheted around the entire piece making sure to single crochet in the chain space on the ends a decent number of times (8 was the magic number for me). Then using my needle and red yarn, I added the simple ‘V’ shaped stitches down the length of the white band to replicate the stitching on a baseball.

baseball headband loop.jpg

Now for the flower, I used this basic pattern for the flowers, but had to tweak the placement of the first round of petals because of the different size I used for the baseball circle. My baseball center was made with 2 rounds of HDC. The stitching was done by hand with red yarn and my yarn needle. When I was done with the flower, I simply attached it to the band using some yarn and my needle.

The very last thing I did was make a long chain (about twice the length of the headband) and knot each end. This is what I used to thread through the loops on the headband and tie behind my head. I did it this way because I don’t like how crocheted headbands stretch out and don’t fit after wearing them for a while. This way, I could custom size it every time I use it. Hope this helps! Have a great Fourth of July!

Baseball Flower 4

Baby on the way!

No, not my baby. I’ve been there, and done that. But a new little niece of mine should be here any day now. One of my younger brothers is about to be a daddy for the very first time, so of course,  I had to whip my brother and sister in law a few baby items.

baby bundle 1.jpg

The secretness of this project has kept my Facebook and Instagram account pretty quiet lately, and I’m so excited to FINALLY be able to share it with you. I’m not gonna lie, this whole gift makes me all giddy and kinda wish I had a baby on the way.

baby bundle-1

Don’t you just love it?! Details on the patterns I used are found below. The color scheme was pulled from the baby’s nursery. The vibrant coral and turquoise pair perfectly with the dark grey and crisp white. What a fun color scheme for a nursery! I used my go-to yarn line, Hobby Lobby‘s ‘I Love This Yarn’ in Greybeard, White, Mango, and Turquoise (all worsted weight).

The striped baby blanket is a pattern by The Felted Button found here. Since this was meant for a baby,  I altered the pattern just a bit to make it smaller. But isn’t that a gorgeous pattern? I have plans to make one that will stay in my house.

sandals and headband

These teeny little sandals are by TMK Crochet found here. I used a different bow pattern, but I have no idea where I found it nor do I remember how I did it (of course, right?).  The headband is AWESOME. If you are familiar with crocheted headbands, you know they stretch (or don’t stretch) kinda funny so their fit is a bit off. Well, fear no more, I found an easy, adjustable, and perfect headband by The Lovely Crow rightly called ‘The Genius Headband’ found here. Seriously, this headband IS magical. And the flower I used is by Autumn Berry Crochet and can be found here.

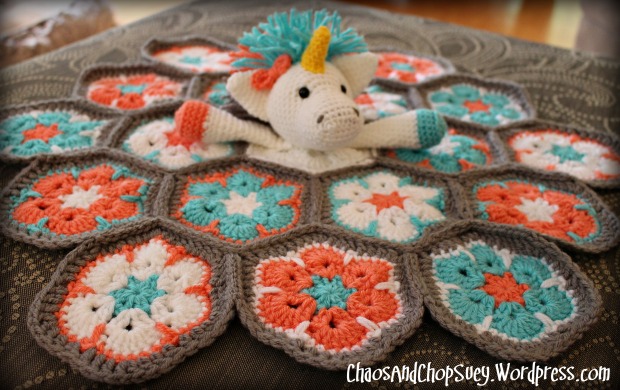
Now for my favorite part of this whole package–the unicorn lovey. You may have noticed that I tend to mix-and-match various patterns to come up with what I make. I first saw an African Flower Hippo lovey made by the talented Amy over at Spicy Tuesday Crafts and knew I HAD to make a lovey using the African Flower motif as the blanket base. It’s just that colorful and fun.

Unicorn lovey 1

I used a random African Flower pattern from the internet (just Google ‘African Flower pattern’ and you’ll find a TON of them) for the base and joined them in a layout that suited my needs. The unicorn head and arms are from One and Two Company‘s Nuru the Unicorn pattern found here. In order to achieve the right scale, I had to go up a hook size or two on the unicorn. The head was made as the pattern states, with a different type of hair because of my own personal preference. I chose to make the arms longer than the pattern stated, again to achieve the right scale. I added a bow over her ear to fancy her up a bit :)

Unicorn lovey 2Unicorn lovey 3-1

Now, to wait for another little baby on the way because I really really want to make another unicorn lovey!

#chaosandchopsuey #crochet #crochetaddict #crochetlover #yarnie #yarnlover #yarnaddict #crochetlovey #babygift #africanflower #crochetafricanflower #unicorn #unicornlovey #crochetunicorn #stripebabyblanket #stripecrochetbabyblanket #crochetsandals #crochetheadband #crochetflower #oneandtwocompany #spicytuesdaycrafts #autumnberrycrochet #thelovelycrow #tmkcrochet #thefeltedbutton#hobbylobby#ilovethisyarn