FRIENDS CAL Week #1: The One with the Couch

The time has finally come for our FRIENDS themed graphgan crochet-a-long (CAL) to begin! It seemed only fitting that our first week’s inspiration comes from the opening credits-the couch in Central Perk.

which-friends-sofa-are-you-2-12866-1425345502-19_dblbig

That orangey couch is not only in the opening credits, but it’s seen in every episode that has a scene in Central Perk, which is practically every episode. That couch has seen a lot-from runaway brides (Rachel fleeing her wedding to Barry in the very first episode) to Phoebe’s boyfriend that didn’t wear enough clothing to some fabulous guest stars (Robin Williams and Billy Crystal).

1411036126592_wps_23_dmxyht_friends_nbc_univer

In homage to this piece of furniture that was an anchor for so many, I give you ‘The One with the Couch’:

couch-50x25-closeup

couch-50x25-full

The One With the Couch (and hook).jpg

Love my hook and want one of your own? Head on over to Angie at Harper Baby Shop.

For more information on the this CAL or to purchase your copy of this crochet-a-long, head on over to my Ravelry store.

Feel free to make and sell products using this, but because I put a lot of time and love into this big CAL project, I ask that you give me credit or if it’s online somewhere, you link back to me. If you’re not a part of our CAL Facebook group, come and join us. We have a special Facebook group reserved only for those that are doing the FRIENDS CAL with us (you can find information on how to join that particular group in your purchased pattern).

I can’t wait to see what you do with this! The official hastag for this CAL is:

#CHAOSANDCHOPSUEYFRIENDSCAL

“Welcome to the real world. It sucks. You’re gonna love it!” –Monica

<3, Angela

Valentine c2c Potholder

Confession: When I learned how to crochet, I totally bypassed the potholder and scarf phase. I jumped right in and made a large amigurumi unicorn for my daughter. I didn’t want to ‘waste me time’ dawdling with things like potholders. I wanted to jump right in and made something useful. At the time, I didn’t have any need for potholders. Funnily enough, I’m at a point right now where, I really do need some new potholders. Ahh…the irony!

img_4635

In my last post, you may have seen my video tutorials for how I work up a mini corner-to-corner (c2c) graph. True to my ‘make pretty but useful stuff’ nature, I decided to make one of those handy dandy potholders I am in need of using that little heart graph from my video tutorials.


img_4646

Valentine c2c Potholder

Materials:

  • Cotton yarn (I used various scrap cotton yarn in white, Pastel Azul (Premier Home Cotton), and Country Red (Sugar ‘n Cream)
  • Size 5.00mm hook
  • Yarn needle
  • Scissors

img_4641

Pattern

Using the HEART GRAPH found here, work up 2 of these heart squares. Need help working on them? Find the videos here. Make sure you make 2 of them now so you won’t burn your hands! I always do a round of sc on my c2c pieces. Always. Makes joining pieces together so much easier. Seriously. You’ll thank me.Now, finish them off and weave in all your ends.

IMG_4638.JPG

Now, holding them together, back to back, using the background color (mint) sc in every stitch all the way around, doing a sc+chain 2+sc in each corner. EXCEPT for ONE corner where you will make your big loop for your potholder (like all potholders seem to have). I chose the top left corner for my large loop and did a sc+chain 10+sc in that corner. Fasten off and weave in end.

For the next 3 rounds (red, then white, then mint), I did a simple moss stitch (sc+chain 1, skip next stitch, sc+chain 1 in next stitch, skip next stitch) all the way around EXCEPT in the corners. Normal corners had the same sc+chain 2+sc as the round before. The large loop in the corner is a bit different. In the first moss stitch round, when you get to the large loop corner, sc around the entire length of the loop and then continue on with the moss stitch when you get to the other length of the square. For the following rounds, you will sc in each stitch on the corner with the large loop. The first row of moss stitch was done in red, then white, then mint for the last row.

img_4647

My First YouTube Video!

As we’re gearing up for the start of our FRIENDS crochet-a-long (CAL), I’ve been getting quite a few questions as to how I work up my mini c2c. So, I complied a list of a few things I wanted to make sure to address in my video tutorial and filmed it. Now, it’s a 4 part series because (1) I have no idea what I’m doing tutorial wise. And (2), I’m super duper duper new to YouTube videos (posting and stuff, not watching them). I’m not a crochet tutorial watcher myself, so I hope what I’ve included is helpful for those that are.

heart-mini-c2c-3

In this tutorial, I go over the basic construction of my mini c2c with instructions on increasing, decreasing, color changes, my basic single crochet border, and a little color change trick I’ve picked up after doing many corner-to-corner graphs.

Later on this week I will post my final project that I used this little heart square for, so stay tuned! If you want to join along, here is a link to the heart graph I used. Using whatever colors you want, work up 2 of these hearts with COTTON yarn and you’ll see what we’re going to do with these! For now, check out my YouTube page!

heart-mini-c2c-1

Messy Bun Hats

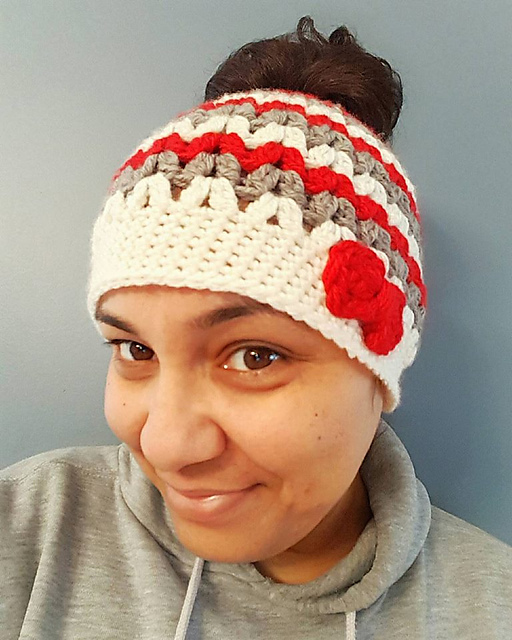
I jumped on the messy bun bandwagon. If you’re unaware, these ‘messy bun hats’ took over the crochet world on social media for a bit. I’m not usually one to jump on the bandwagon with things like this, but after having to flat iron my curly hair so I could wear my hair down for the sole purpose of wearing a winter hat one day, I grabbed my hook and whipped one up for myself. Besides, I needed to make myself an Ohio State University colored hat.

15741252_1199473676754668_750445334015767139_n_medium2

Using an H (5.00mm) hook and Hobby Lobby’s I Love This Yarn (in Red, Ivory, and Greybeard), I followed Sarah Zimmerman’s pattern from Repeat Crafter Me. I made just a few modifications to suit my needs better. In Sarah’s pattern, the starting round works around a joined chain (the hole for your messy bun), but I wanted mine to be able to stretch as needed, so instead, I worked my starting stitches around 2 rubber hair ties. I also added a few extra cluster V-stitch rows as Sarah’s pattern was just a bit too short for my head. And I added a tiny little bow using this pattern.

15774867_1199369020098467_2969903355282845418_o_medium2

When I showed a friend of mine this hat, she had to have one as well. So I made her an Ohio State colored messy bun hat. Well, she loved it so much, she asked for another one when I showed her this one with a huge bow on the backside. And it is so stinking cute with that giant bow under her messy bun.15940545_10155027912444916_8305495061213370803_n

I did the same thing for the hat as stated above, but the bow was my own. Using an I hook, I chained 35, joining at the end. Continued to make 4 rounds of DC. Before fastening off, I folded the band in half with the seam down the center (not edge) and loosely sewed both layers together, cinching at the bottom. For the band to cover the middle, I chained about 13 (you’ll have to try this out for yourself to see what works) and HDC for 2 rows. Before fastening off, I left a long tail and joined both ends of this small piece on the backside of the bow, sewing them together. I used that long tail to attach to the hat. Simple and cute!

FRIENDS CAL

Yup. Still excited for this crochet-a-long to start. I just made a few more bonus squares yesterday and I’m bursting at the seams to share them with you. I CAN’T WAIT!! lol

See? Even Phoebe is excited. :)

phoebe-promo

You can purchase the pattern for the FRIENDS CAL here on Ravelry (make sure you are SIGNED IN when you purchase it).

friends_cal_placemarker_small2

Use the link in the PDF file you will receive right away to join the FRIENDS CAL Facebook group (make sure you let me know who you are on Facebook and Ravelry since names don’t usually match up). Can’t wait to see you all!

<3, Angela

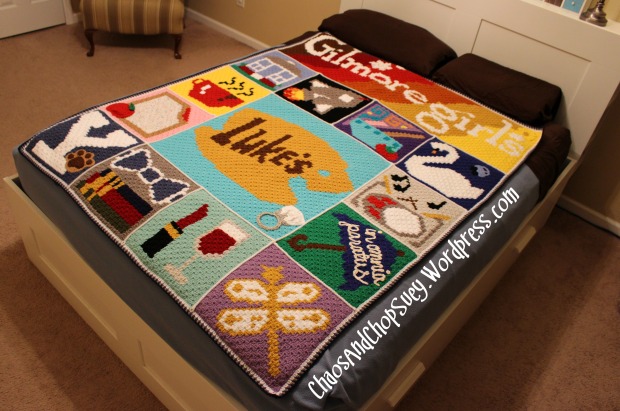
Gilmore Girls CAL-Border

I was reminded yesterday that I still hadn’t written anything up on the border I decided to use for my Gilmore Girls graphgan. I had a hard deciding what colors I was going to use (I used so many different colors in this blanket, that I had many to choose from) for the border, but finally decided on going with a Chilton plaid color scheme since I never got around to finishing that Chilton plaid mini-banner I wanted to do.

completed-gg-blanket

Here are the colors I used (and the order from top to bottom) in which I used them:

Border colors.jpg

Once my blanket was complete, I used white to do a round of HDC all the way around. Then from there, I just did a simple Moss stitch round in each of the 3 remaining colors. Moss stitch is SC + chain 1, skip the next stitch below and SC + chain 1 in the next stitch. Once you’ve finished your first row of SC + chain 1, you will then SC in the chain 1 space for the rows after that. It’s a clean, simple, quick border that doesn’t add a lot of bulk to your blanket.

border-edge-1

For the corners, I did an SC + chain 2 + SC combo in each corner. The 2 SCs in that combo are always done in the chain 2 space created in the previous row. Be sure not to pull your yarn really tight when working on this border or you will end up with a scrunched up border (ripples). If you are a tight crocheter, you may want to even consider going up a hook size for the border.

Border Corner 1.jpg

While my Gilmore Girls CAL posts will stay up and remain free, for convenience, I have also combined all of these graphs into one giant PDF file for those that would like to purchase a copy of it condensed, rather than having to hunt thru my posts. You can purchase this pattern for a small fee here on Ravelry.

For now, I am gearing up for my FRIENDS CAL that will be starting on January 30th. Stay tuned for more information!

As always, for more information on the this CAL, check out this IMPORTANT DOCUMENT.

Feel free to make and sell products using this, but because I put a lot of time and love into this big CAL project, I ask that you give me credit or if it’s online somewhere, you link back to me. If you’re not a part of our CAL FB group, come and join us here.

I can’t wait to see what you do with this! The official hastag for this CAL is:

#CHAOSANDCHOPSUEYGGCAL

Copper Boom!

<3, Angela

FRIENDS CAL Announcement

My friends, the day has come. The day to officially announce my FRIENDS crochet-a-long (CAL). I am so stinking excited to start this project. FRIENDS is my absolute favorite show and I am not lying when I say I wouldn’t be surprised if I end up with 2 blankets because I will want to make every single square.

chandler-promo

You can purchase the pattern for the FRIENDS CAL here on Ravelry (make sure you are SIGNED IN when you purchase it).

friends_cal_placemarker_small2

Use the link in the PDF file you will receive right away to join the FRIENDS CAL Facebook group (make sure you let me know who you are on Facebook and Ravelry since names don’t usually match up). Can’t wait to see you all!

<3, Angela